Have you ever tried to use nail striping tape? It’s a super cool and easy-to-use tool that can help you create amazing designs on your nails. If you’re looking to up your nail game, this tape is definitely worth a try. You can use it to make all kinds of designs, from simple stripes to intricate geometric patterns, so you can really let your creativity shine.
In this article, we’ll walk you through how to use nail striping tape step-by-step, so you can create your own unique and impressive designs.
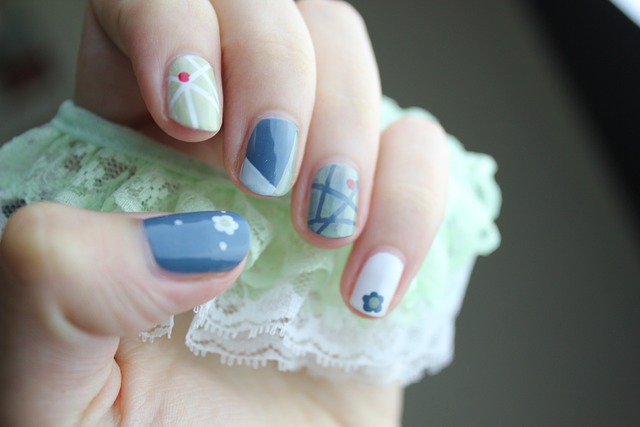
What is nail striping tape?
Nail art striping tape is a thin, self-adhesive tape made for creating intricate nail designs.
It’s a thin, flexible, colorful tape that you can cut into different lengths.
You can use it to add precise lines, stripes, and geometric patterns to your nails.
And this will make your manicures look super cool.
Here’s how it works:
After your base color dries, you stick the tape onto your nails without damaging the polish underneath.
No glue is needed since the tape is self-adhesive.
You can also paint around the tape using other colors, create funky negative space designs, or use it as a guide for freehand painting.
Once you’re done with the design, seal your nail art with a top coat.
Striping tape is a great tool for DIY salon-quality manicures that can take your nail art to the next level:
1. Precision and Clean Lines
With this tape, you can effortlessly achieve precise lines and clean edges.
It acts as your trusty guide, making your designs look sharp and well-defined.
You can use it for straight lines, intricate patterns, or geometric shapes.
2. Versatility and Endless Design Possibilities
Nail striping tape is like a magic wand for your creativity.
It opens up a world of design possibilities.
Mix and match colors, create unique geometric patterns, or try out negative space designs.
The tape gives you the freedom to explore and express your unique style.
3. Beginner-Friendly
Don’t worry if you’re new to nail art.
The tape is here to make your life easier.
It’s super beginner-friendly.
You can create complex designs in an instant.
Even if you’re just starting out.
4. Time-Saving
You can create stunning nail art in minutes.
No need to spend hours meticulously painting complicated designs and perfect lines.
Jusy apply the tape, seal it, and voilà!
You’ll have eye-catching nails without sacrificing your precious time.
5. Professional-Looking Results
Nail striping tape is like having a professional technician at home.
The clean lines and precise designs it helps you achieve give your manicures that polished and sophisticated look.
Your friends will be convinced you’ve been sneaking off to the salon!
How to use nail striping tape
The key to success is to plan out your design beforehand.
Once your base color is dry, carefully apply the tape to your nail in the desired pattern.
One of my favorite methods is using the tape to create negative space designs on clear polish.
I apply it over a clear base coat and carefully fill in some areas with a color polish and a thin nail art brush.
Then I seal it off with a top coat.
Another nail design I absolutely love is using metallic striping tape with a matte top coat.
It adds a gorgeous contrast and a unique, and modern touch to any manicure.
Nail striping tape is versatile and can be used for accent nails for a pop of color or a statement look.
Try combining it with other nail art techniques or use on its own for a stylish and minimalistic design.
Use tweezers to pick the tape’s end from the roll and cut it with small scissors.
Also, remember to press down firmly on the tape to let it bond with the nail more securely.
Tools and supplies
1. Nail Striping Tape
You’ll need a roll of high-quality tape.
Since this material is self-adhesive, you won’t need to buy glue.
Look for thin, flexible tape made of vinyl or metallic foil in various colors and finishes.
Try the popular Vonrui tape
This product is made of high-quality vinyl.
It’s super thin, allowing for precise placement.
Plus, it comes in an array of vibrant colors and finishes.
The adhesive is just right, providing a secure hold without damaging the base polish.
So I like the quality of this tape. It’s reliable and easy to work with.
2. Precision Tweezers
Get yourself a pair of precision tweezers designed for nail art.
This handy tool makes it a breeze to handle the tape, find and pick up its end.
Some tape sets come with tweezers already included.
3. Nail Scissors or Clippers
You’ll need to trim the tape to the desired length and remove unwanted tape ends after you place it on the nail.
Nail scissors or clippers with a sharp edge will help you cut it with precision.
4. Base Coat and Nail Polish
Don’t forget your base coat and chosen nail polish colors!
The base coat creates a smooth surface for the polish to adhere to.
And nail polish will be the canvas for your striping tape designs.
5. Top Coat
Seal and protect your nail art with a top coat.
This will give your manicure a glossy, long-lasting finish.
And will help your designs to stay intact for days.
6. Rubber Cuticle Pusher
Use a cuticle pusher with a rubber end to press the tape down onto the nail, smooth it out, and help it adhere.
6. Nail Art Brushes or Dotting Tools (Optional)
If you want to add extra creativity to your designs, consider having nail art brushes or dotting tools on hand.
They allow you to add pretty details, dots, or other decorative elements alongside the nail striping tape.
7. Nail Polish Remover and Cotton Swabs
To clean up any mistakes or smudges around the tape, keep nail polish remover and cotton swabs nearby.
They’ll help you get a neat and polished final look.
How to use nail striping tape step by step
1. Prep your nails
File and shape your nails as desired.
Then apply a base coat to create a smooth surface for your nail art to adhere to.
2. Apply the base color
Choose a color you love and paint your nails with this base color.
Allow it to dry completely before moving on to the next step. Patience is key!
3. Pick the striping tape
Take your striping tape, pick the end of it with tweezers.
4. Cut the tape to the desired length
Get your nail clippers ready and carefully cut a piece of tape wider than
your nail to let you handle it easier.
Step 5: Position the tape.
Time to get creative! Gently place the striping tape on your nails in any pattern or design you fancy.
Press it down with your fingers or a rubber cuticle pusher, so it sticks well.
Smooth it out.
Step 6: Clip the unwanted parts of the tape
Use your nail clippers to clip off extra bits of tape.
Step 7: Apply the top coat.
Almost there! Apply a layer of top coat over your nail art.
This will seal in your fabulous tape design, add shine, and protect it from lifting.
Can I use nail striping tape with any type of nail polish?
This materual works well with both regular polish and gel polish.
Just make sure to let your base color and any additional nail polish layers fully dry before applying the tape.
How long does nail striping tape stay on?
It depends on the quality of the tape, how well it’s been applied, and your daily activities.
Generally, striping tape can stay on for a few days to a week with regular polish and 2–3 weeks with gel polish.
Don’t forget to seal it with a top coat to prolong its lifespan.
Can I reuse nail striping tape?
No, you can’t reuse the tape because it gets ruined once you remove your design.
Just use fresh pieces of tape for each manicure.
What if the striping tape doesn’t stick well to my nails?
Make sure you polish layer is dry, clean, and free from any oils or lotions.
Press the tape down firmly after applying it to help it adhere better.
If the issue persists, you can try using a layer of clear sticky top coat over your base color before applying the tape.
Can I use nail striping tape on natural nails and artificial nails?
Yes, you can use it on both natural nails and artificial nails, such as acrylic or gel extensions.
It works well on any surface, providing tons of design possibilities.
Can I use nail striping tape on short nails?
Absolutely! It can be used on nails of any length, including short nails.
In fact, it can create the illusion of longer nails with vertical or diagonal lines.
Can I combine nail striping tape with other nail art techniques?
The lovely tape can be combined with various nail art techniques like stamping, stenciling, or freehand designs.
Get creative and experiment with different combinations for unique and eye-catching nail art.
How do I prevent the striping tape from wrinkling or bubbling?
Press it down firmly onto the nail surface after applying.
Smooth out any wrinkles or bubbles with a rubber cuticle pusher to make the design clean and flat.
Can I use nail striping tape on toenails?
It can be used on toenails just as well as on fingernails.
Why not add a stylish touch to your pedicure?
Can I use nail striping tape with a matte top coat?
This tape works well with both glossy and matte top coats.
I absolutely love to use metallic gold or silver tape with a pink, neutral, or gray matte polish.
How do I store my tape?
To keep your tape in good condition, store it in a cool, dry place away from direct sunlight.
Seal the roll tightly or keep individual strips in a ziplock bag to prevent them from losing their adhesive properties.
Can I combine different widths of tape in one design?
Yes, mixing different widths can create interesting and dynamic designs.
Feel free to experiment with various sizes and see what unique patterns you can create.
How to use nail striping tape on natural nails that have ridges or uneven surfaces?
You can apply a self-levelling rubber base coat or ridge-filling nail polish to create a smoother surface before applying the tape.
Nail striping tape is seriously amazing!
It opens up a whole new world of creative possibilities in nail art that you’ll love exploring.
Trust me, it’s so versatile and easy to use that you can achieve professional-looking designs with crisp lines and intricate patterns in no time.
Just follow the step-by-step instructions.
And you’ll be able to confidently apply this tape to take your nail art game to the next level.