Here is an easy to use nail shapes chart and a nail shapes guide.
There are many different types of nail shapes for you to choose from. But what is the best nail shape for your nails? The nail shape must look good on your hands. It must not compromise the strength of the nails or nail extensions and it should be compatible with your lifestyle.
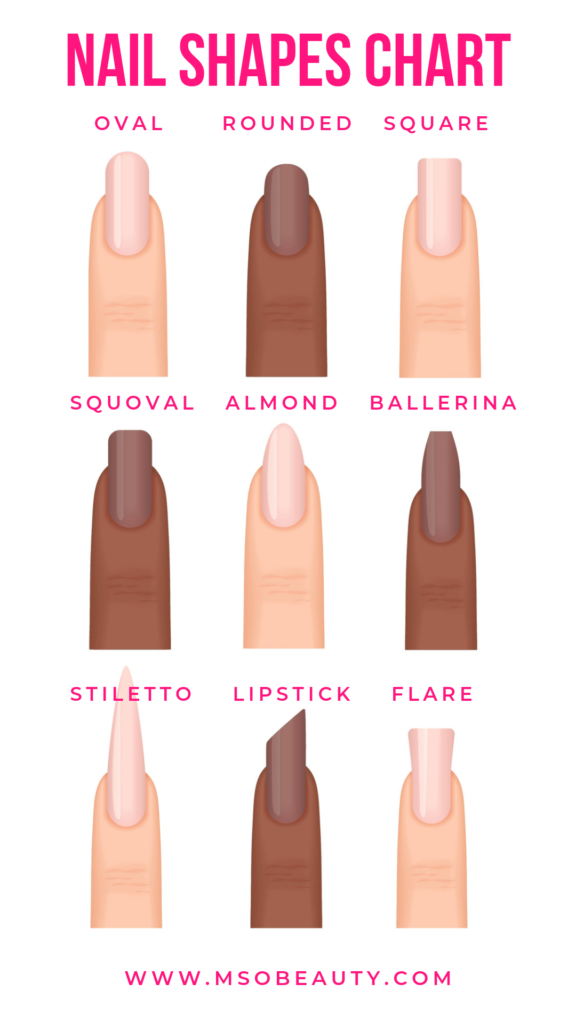
Nail shapes chart
Nail file you can use for filing these shapes:
Makartt Zebra 100/180 Nail Files
I recommend using a 100/180 grit semicircle emery board for filing all these nail shapes.
It has an ergonomic form that allows you to get a good grip.
It also has the right material and grit for filing natural and artificial nails quickly and safely.
Use the 100 grit side for shaping nail extensions and the 180 grit side for shaping natural nails
Nail shapes guide: types of nail shapes
Almond nails
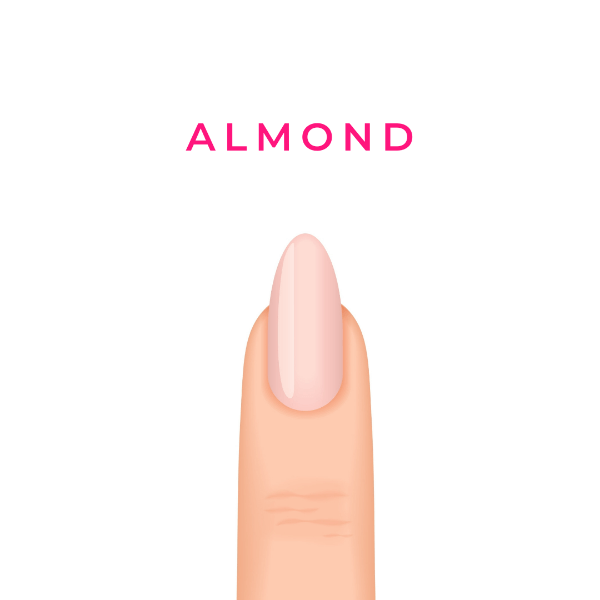
Almond nail shape is an elongated oval nail shape that is narrower at the tip than an oval.
These nails really look like almonds.
Almond nails are pretty much universal and suit anyone.
They make your fingers appear long and slender so this shape is perfect for people with shorter and thicker digits.
However, you must be careful when wearing this shape because the slightly pointed end can get damaged.
Almond shape can easily break on natural nails.
For example, be careful when wearing this shape when playing sports or if your natural nails are weak and brittle.
This shape is more suitable for nail extensions.
That’s because almond nails look best when they are long.
They look weird and blocky on short nails.
Their free edge can be at least as long as the length of the nail bed.
In fact, the best-looking length for the free edge is twice as long as the length of the nail bed.
You can’t create that length on natural nails.
So acrylic, gel, or polygel nails would be a great option for building the almond shape on your nails.
You can choose the oval shape for short natural nails instead.
It’s similar to the almond shape but is more balanced and durable for the natural nail plate.
However, if your nails are strong and you can grow them out you can create the almond shape on natural nails.
Don’t use the almond shape on natural nails that tend to curve downwards. Or they will look like a set of claws.
Instead, create extensions with dual forms that will compensate the curve and make your nails look straight.
Here are the steps for creating almond nails:
Start with filing each side edge of the nail going from its respective nail growth point down to the tip of the free edge rounding the tip in the process.
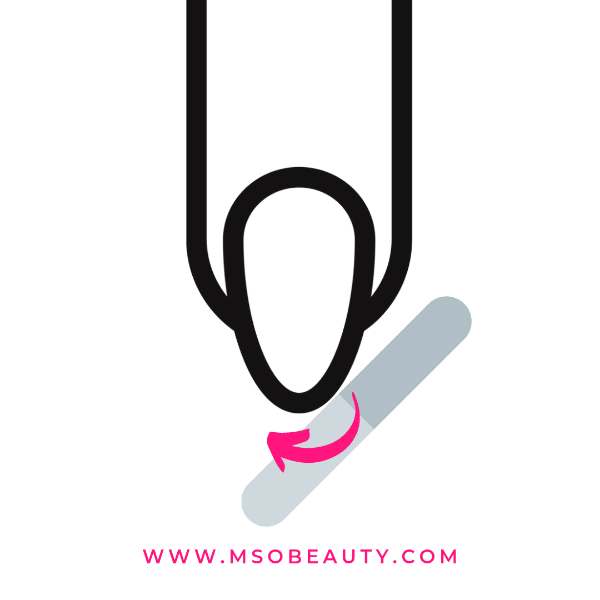
Nail growth points are the spots in the corners of your nails where the nail’s free edge leaves the nail bed and detaches from the skin.
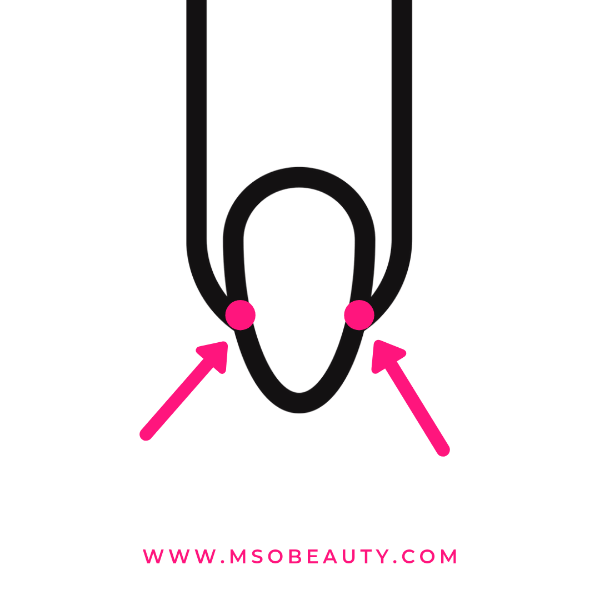
Don’t file in a back and forth sawing motion. That may cause splitting.
Keep filing in short strokes in one direction only, from the side edge towards the center.
Don’t dig with your file beyond the nail growth points. Or you’ll make notches in your nails, and that would compromise their strength.
Ballerina or coffin nails
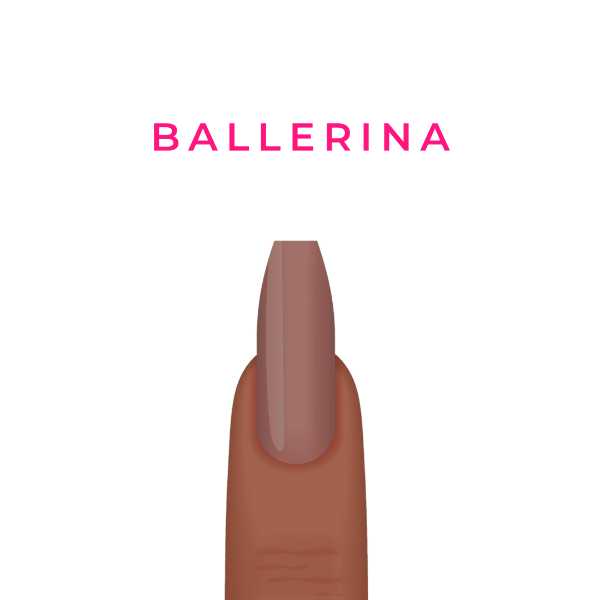
The second shape on our nail shapes chart is the ballerina shape.
Coffin nails, aka ballerina nails, are a cross between square and almond nails.
The tip of a coffin nail is flat and has corners like the tip of a square nail but the side edges aren’t parallel, similar to almond nails.
The coffin shape is probably the most popular shape for nail extensions on my nail shapes chart.
This shape looks really glamorous and beautiful.
Plus, it’s an excellent base for ombre nails. You can easily create this look by using a mood-changing gel nail polish, such as the Modelones color-changing gel nail polishes.
But it’s not suitable for natural nails because they’re not strong enough for this shape.
The tapered ballerina shape looks good on long and extra-long nails. And it’s almost impossible to rock natural nails of this length. They can break easily.
But if your nails are naturally strong and the nail plate is thick you can try this shape.
Start shaping your nails in the same way as you would do square nails, by flattening the tip.
Then file the side edges at an angle, like almond nails.
And, again, finish the filing process by checking the nail from the side to make sure the side edges are parallel to the nail’s growth axis. That way your nails won’t dip down or become spoon-shaped.
You can also reinforce the natural nails with a nail overlay.
However, the ballerina/coffin shape works best with nail extensions.
This shape is perfect for acrylic nails.
Acrylic is a super-strong material that can withstand all the stress that ballerina nails receive.
Mia Secret Acrylic Nail Kit
But it also works great with polygel, which is a cross between gels and acrylics.
This material is very easy to use and looks gorgeous.
You can create coffin polygel nails easily with a set of dual forms.
These forms will help you build perfectly-shaped coffin nail extensions.
Modelones Polygel Nail Kit With Dual Forms And Lamp
You can also create coffin nails from long square nails if their corners have chipped to continue wearing these extensions instead of creating a new set.
Artificial coffin nails last longer than square nail extensions because they have a narrow shape at the tip, while the square shape receives a lot of wear and tear in the corners.
So ballerina nails break and chip less frequently than extra-long squares.
Stiletto nails
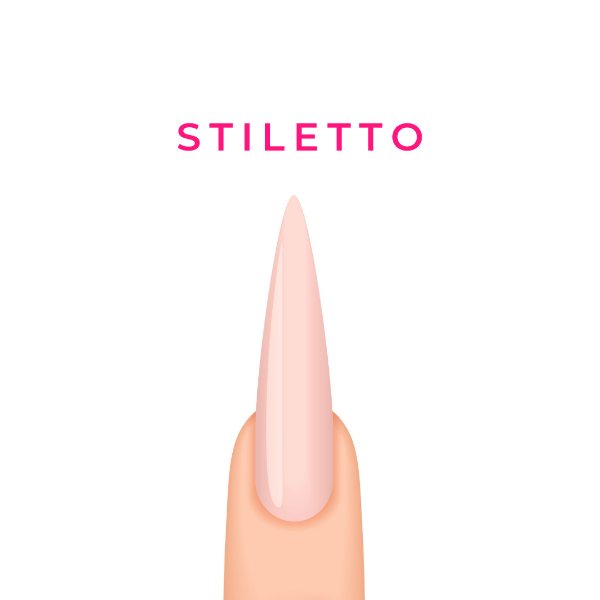
Stiletto nails are very long and pointy.
They have a super-sharp tip and are the sharpest nails on my nail shapes chart.
These nails look glamorous and would instantly make you the center of attention.
This shape can only be created with artificial material. Such as acrylics, gel, or polygel.
Stiletto nails must be super-strong as they are easy to break.
The long pointed shape is created by building stiletto nail extensions from scratch. Not by filing other nail shapes into this shape.
The filing of the sidewalls of the stiletto nails is mostly needed for perfecting the shape and for adding the finishing touches.
It’s not easy to create stiletto nails. You must build this shape correctly with a proper apex curve to make them durable.
The best material for stiletto nails is, of course, acrylics.
Acrylic nails are strong so the pointy tips won’t break off easily.
You can use stiletto tips or foil forms with acrylics to create these nails.
Morovan Acrylic Nail Kit
Aoraem 500 Pieces Stiletto Tips
You can also use polygel with stiletto dual forms.
Polygel is strong too and dual forms will let you shape stiletto nails quickly and easily.
Makartt Polygel Nail Kit
AORAEM Stiletto Dual Forms
Or you can buy stiletto press-on nails.
720 Pieces Stiletto Press-On Nails
Don’t try to create another shape by shortening your stilettos.
This will break the structure of your extensions. So they may break later on.
It’s best to remove stiletto nails and create a new shape from scratch.
Square nails
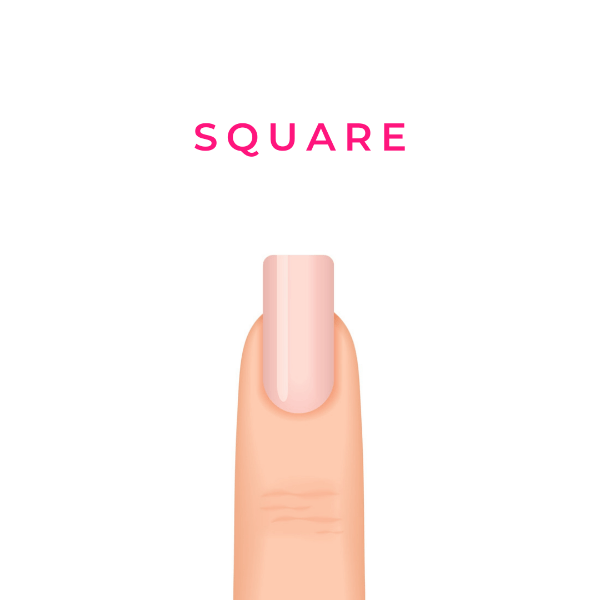
Square nails have parallel side edges and a flat tip that’s perpendicular to the sides.
The corners of square nails should not be too sharp. You don’t want to damage anyone with these nails.
Square nails are really strong and durable. They’re difficult to break. This is the most durable shape on my nail shapes chart.
For example, they’re great to wear if you’ve got a lot of typing to do.
Square nails are also durable enough for playing sports.
This shape is perfect for French manicure nails, where the nail is painted in pink, peach, or beige color and the tip is white.
The square shape is great for natural nails and looks good on moderately short nails.
Normally, a gel polish manicure can last for up to 2 weeks on square nails if you apply the polish right.
If these nails are short the coating can even last for up to 3 weeks.
The shorter your nails are the longer the polish will stay.
However, gel nail polish doesn’t stay on square nails as well as on oval nails.
The corners of square nails receive a lot of stress and the polish sometimes chips and lifts in these areas.
To create the square shape on your nails you’ll need to file each nail down to the desired length and file the tip to a straight line.
The line of the tip should be at a 90-degree angle to the central axis of the nail.
Then file the side edges to perfection.
Make sure you don’t round the tip in the process.
Look at the side of each finger to make sure the side edges are parallel to the nail growth plane. File the side edges if needed.
That will ensure your nails won’t curve down or up.
You can also wear this shape with long acrylic nails.
It’s a strong and great-looking shape for nail extensions.
It looks a bit similar to the coffin shape, but the side walls are parallel to each other and don’t taper towards the end.
Squoval nails
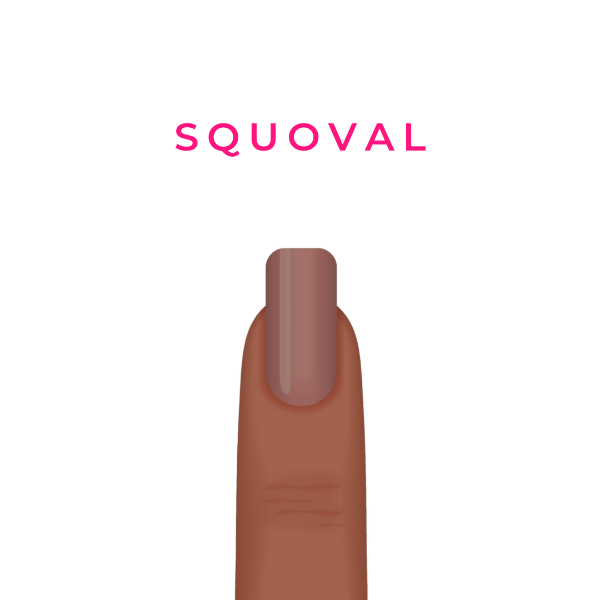
Squoval nails are similar to square nails but have a rounded tip and corners.
Since the tip is rounded, gel nail polish stays better on squoval nails than on square nails.
It won’t chip as easily as on square nails.
This shape looks great on natural nails.
And it works well with any color of nail polish.
Just like square nails, squoval nails look good with the French manicure.
The filing process is similar to doing square nails.
First, file down the length and file the tip to a straight line.
File the sidewalls to perfection.
After that, round the corners to create squoval nails.
Oval nails
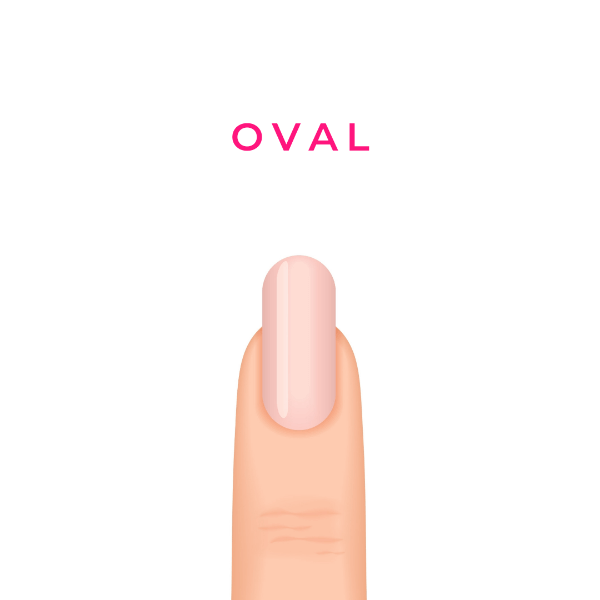
The oval shape is the most popular shape for natural nails.
It fits anyone and looks flattering on any hands, on all finger shapes and nail types.
This shape makes any hand look more slender and the fingers appear longer.
It’s an elongated rounded shape that narrows slightly towards the tip.
However, it’s wider and shorter than almond nails.
This nail shape has no corners. Only smooth curvy lines.
The oval shape is good for short nails but looks better on slightly elongated nails.
It’s also great for wearing gel nail polish on natural nails.
Since there are no corners in this shape, the polish stays longer on oval nails than on any other nail shape.
Gel nail polish can last for up to 2-3 weeks on oval nails with no chips or peeling, provided you’ve applied the polish properly.
However, oval nails have their limits.
They are less durable than square nails.
They shouldn’t be used on long or extra long nails.
Choose the almond shape if your nails are really long, especially if you’re creating nail extensions.
Almond nails are more pointed than oval nails. So the free edge won’t be too heavy and will look more balanced on very long nails.
How to file oval nails:
Start by filing your nails down to the necessary length.
Then file the sidewalls from the nail growth points to the center of the tip rounding the tip in the process.
Make sure the shape isn’t too narrow and looks symmetrical and balanced.
Rounded nails
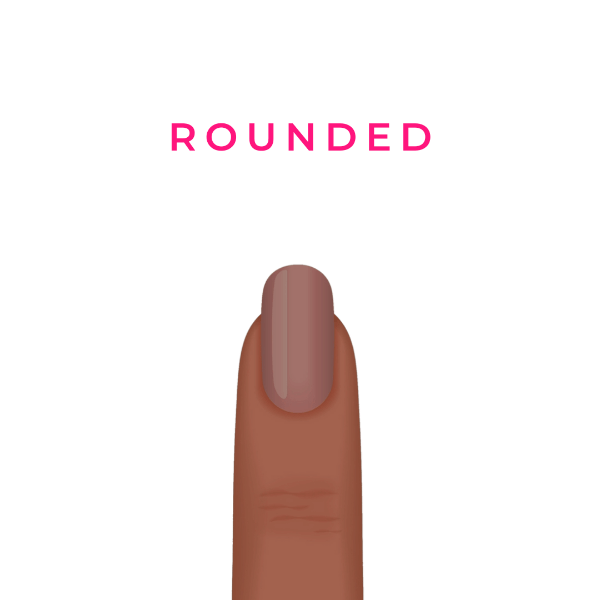
Rounded nails are the shorter form of oval nails with a blunt tip.
Just like oval nails, the rounded shape doesn’t have any angles.
Nail polish and gel nail polish stays on this shape well, up to 3-4 weeks.
This shape is the best one for short and very short natural nails.
There’s no point in creating rounded nail extensions but this shape can be enhanced with a nail overlay.
The rounded shape is the easiest one to create on our nail shapes chart and is very beginner-friendly.
File from one nail growth point to the center rounding the nail in the process.
Repeat the process on the other side of the nail.
Keep filing in one direction only to prevent splitting.
Alternate between sides to make the shape symmetrical.
These were the most popular and commonly used shapes for natural nails and nail extensions in my nail shapes guide.
However, there are also less common shapes like lipstick, flare, etc.
Lipstick nails
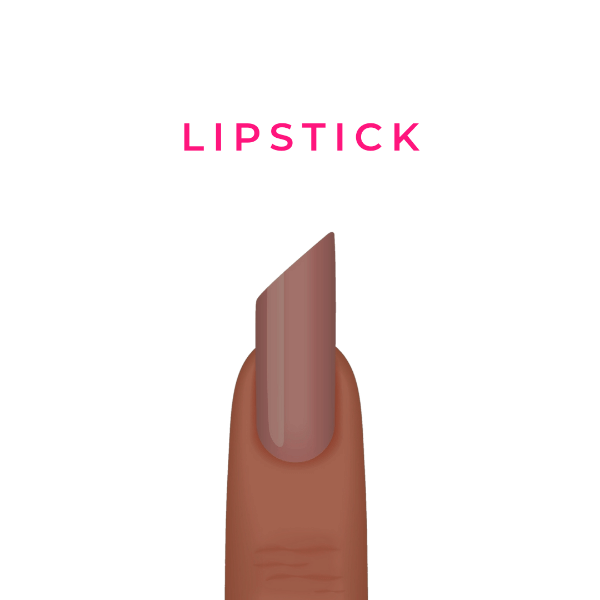
Lipstick nail shape is an asymmetrical angled shape where one corner of the tip is a lot higher than the other
So this shape resembles lipstick.
Lipstick shape was a popular trend on Instagram a short while ago.
It’s a cross between square and stiletto nails that looks good with bright and geometric nail designs.
This shape was invented by a South Korean nail artist.
Flare nails
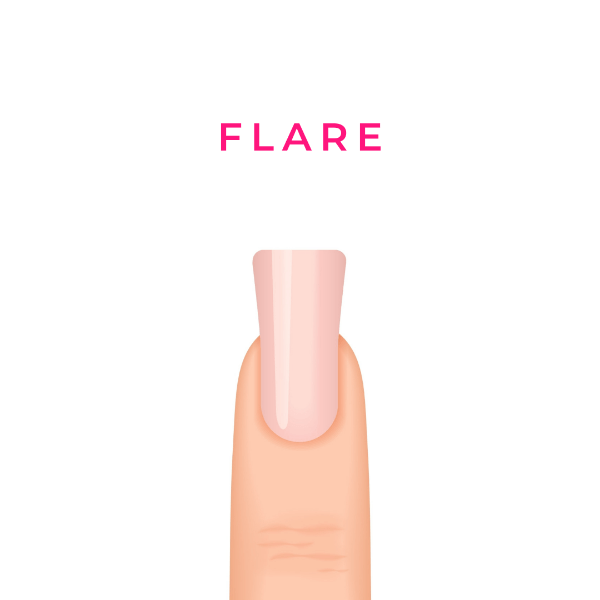
Flare nails, also known as trapeze nails, are nails that notably flare out at the tip and look like fans, flared jeans, or duck feet.
Since natural nails never flare out that much, flare nails are always artificial.
You can wear them either long or short.
However, keep in mind that the edge comes out pretty heavy and these nails are too easy to break.
Flare is probably the weirdest-looking nail shape on this list.
Some people even believe it’s the ugliest nail shape that has ever existed.
So choose this shape at your own risk, even though it’s a popular crazy fad on Instagram.
Nail shapes guide: What nail shape should I get? How to choose the best nail shape for your nails
The look of your manicure depends on the right shape a lot.
The shape you choose must complement your finger and nail bed shape.
It must also be trendy, work well for your lifestyle.
And of course, it must be strong, safe, and durable for your nails.
Artificial vs natural nails
Choose the shape of your nails depending on what type of nails you’re planning to wear.
Some shapes, such as coffin and stiletto nails, are best for long and strong nail extensions.
While some other shapes will look great on shorter natural nails. For example, square, oval, rounded, and squoval nails.
Nail length
Again, nail length is a crucial factor for selecting a nail shape.
You can’t create short coffin or stiletto nails, for example.
And oval and rounded nails can’t be extra-long.
The longer the nails are the stronger you should make them.
Artificial nails are always stronger than natural nails.
So choose a shape that works best with extensions if you are planning to wear extra-long nails.
Nail bed shape
Different types of nail beds look good with different shapes.
For example, if you have wide nail beds, wide or short fingers you should choose oval or almond nails.
These shapes will make the nail beds and fingers look more slender and longer.
And square and squoval shapes look great on thin and elongated nail beds and long fingers.
Cuticle line shape
An important rule for choosing the most flattering shape of the free edge is that it should basically repeat the shape of your cuticle line.
That would create a nice and balanced nail.
Cuticle lines vary. Some people have square cuticles, while others can have oval cuticles, etc.
So choose the shape that fits your nails.
Nail growth angle
Some nails naturally grow perfectly straight.
However, some nails grow a little upwards or curve downwards.
You can have several types of nails on the same hand.
For example, your index finger’s nail can curve down and your thumb may grow a bit upwards.
Some shapes work best for nails that curve downwards and some are suitable for spooning nails.
For instance, the almond shape won’t look good on natural nails that curve down.
So choose a nail shape that complements most of your fingers.
The good news is that you can correct your natural shape when creating nail extensions.
Foil and paper forms for nail extensions work for all nail types.
You’ll need to apply these forms at an angle by doing a few cuts in the form to compensate for the natural curve of your nails.
For example, the forms should face a little upwards if your nails curve down.
Lifestyle
Some people’s lifestyle may be incompatible with certain nail shapes.
For example, if your workplace has a dress code that doesn’t allow you to wear extra-long nails you may not be able to select the coffin or stiletto shapes.
Also, if no polish ever stays on your natural nails you may want to choose the rounded or oval shapes instead of square or squoval nails.
That’s because corners get more wear than shapes with no corners.
However, if you need to type a lot and are afraid to break your nails then longer square nails are more durable than longer almond/oval shapes.
Trends
Of course, you may want to create a trendy shape on your nails.
Today coffin nails are at the peak of their popularity.
Square and oval nails are a hot choice for natural nails.
I hope that these nail shapes chart and guide help you choose the best nail shape for your nails.
Recommended reading:
Best Professional Gel Nail Polish Brands Used In Salons
How To Shape Almond Nails — The No Nonsense Guide
11 Best Nail Files For Natural Nails That’ll Make Nail Shaping Easier
10 Best Korean Cleansing Balm Products That’ll Probably Be Your New Skincare Secret
15 Best Korean Foam Cleanser Products For All Skin Types
7 Best Magnets For Nail Polish To Help You Create Stunning Cat-Eye Nails
10 Best Nail Polish Pens And Pen Sets To Make Easy Nail Art At Home
14 Best Nude Gel Nail Polish Colors For Every Skin Tone
How To Remove Gel Nail Polish From Acrylic Nails Without Ruining Them: 2 Proven Ways
How To Thicken Nail Polish For Stamping Easily?
Do I Need A Base Coat For Gel Nails? Here’s The Answer!
Do You Need A UV Lamp For Acrylic Nails?
How To Thin Out Nail Polish Like A Pro Nail Tech?
How Long Does A French Manicure Last?
Non-Toxic Gel Nail Polish Brands 101: Choose The Safest Gel Nail Polish
Most Popular Shellac Colors – The Ultimate List Of 15 Best Shellac Colors For Fantastic Manicures
Best Gel Base And Top Coat: The Updated List Of The Best Gel Nail Base And Top Coat Sets
Why Are My Gel Nails Lifting? 15 Reasons Why Your Gel Polish Is Lifting
Overlay Nails 101: Acrylic And Gel Nail Overlay On Natural Nails – The Ultimate Guide
Best No Light Gel Polish — Gel Nail Polish Without UV Light
Nail File Grit Guide And Chart
12 Best Polygel Nail Kit Reviews And How To Apply Polygel At Home
Best Nail Dehydrator And Primer: The Ultimate Guide
Best Small Salon Reception Desk For A Tight Space: Make An Amazing First Impression!
13 Best Korean Snail Serum Products That May Seem Too Good To Be True
7 Best Korean Peel-Off Mask Products For Improving Skin Texture
14 Best Korean Snail Sheet Mask Packs That May Make Your Skin Glow


