It’s easy to get lost in the sea of nail files available on the market. What do all these grit numbers mean? Here are the nail file grit chart and guide that will help you choose a perfect nail file for your needs with confidence.
Nail files are necessary for shaping natural and artificial nails and for making their surface smooth.
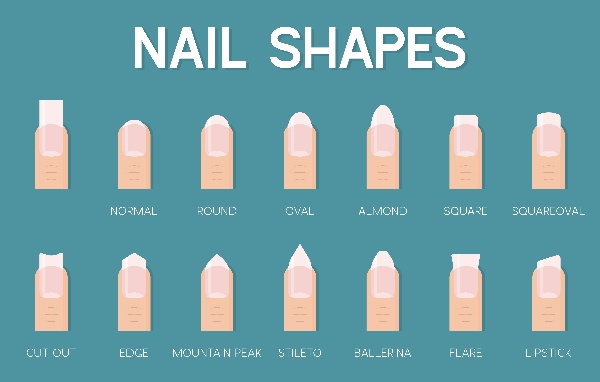
You can file your nails to a nice shape, like oval, almond, or square with the help of a nail file.
With a file or buffer, you can also make your natural nails smooth if they have ridges or remove any extra material you’ve placed on the nails while creating nail overlays and extension.
You can also prepare your nails for gel nail polish application or make them shiny even without any polish.
Nail file grit chart
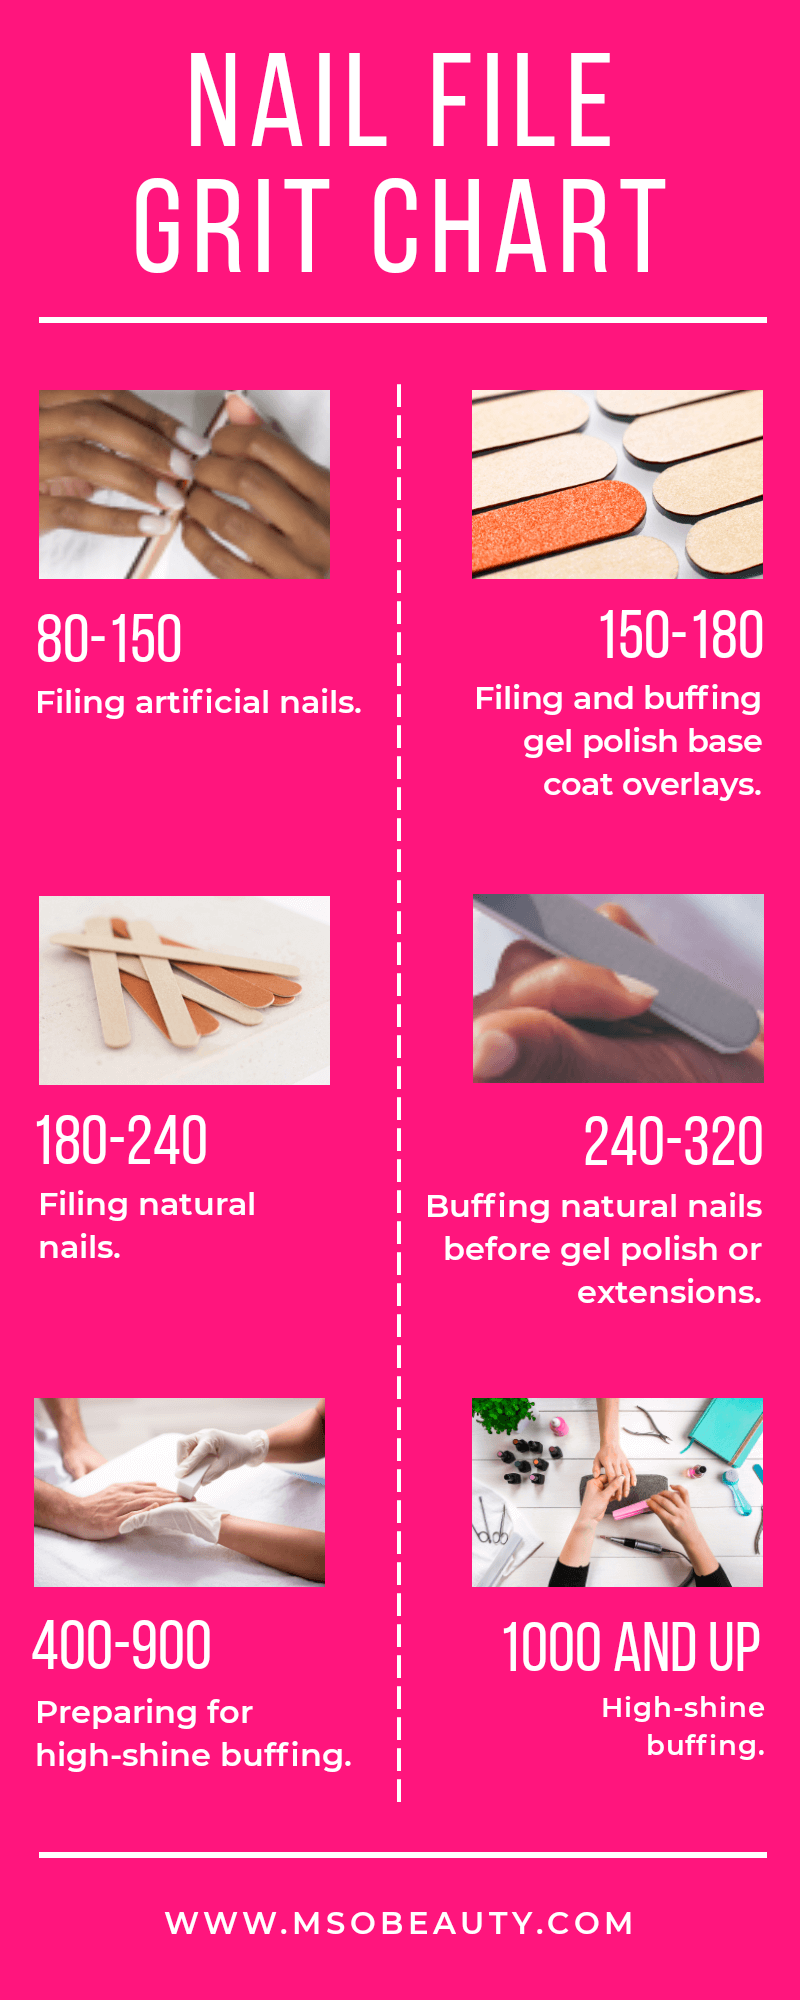
What is a nail file grit?
The grit is the level of abrasiveness of the surface of a nail file.
The numbers represent how coarse the surface is.
The lower the number the coarser it is. From 50 being the coarsest to 1000 being the smoothest, micro-abrasive surface.
Flat nail files often have two abrasive surfaces. One on each side of the file. And buffing blocks have four surfaces.
Both surfaces of a file can have the same grit.
But they often have different grit numbers. That way you get 2 files in 1.
So if you see two numbers with a slash in the description of a nail file then this tool has two surfaces with different levels of coarseness.
For example, 180/240, where one side is coarser than the other, and you can use this file for two purposes: filing the natural nails in shape with one side and buffing them before gel polish application with the other.
Each nail grit has a special purpose.
Nail file grit guide
80-150 grit – For filing nail overlays and extensions
Teuki Professional Nail File 100/150 Grit Double Sided
This is the coarsest grit you can have on a nail file.
Very coarse files must only be used on artificial nails. For example, acrylic, hard gel, and polygel nail extensions and overlays.
80 grit is too coarse even for fake nails. Only use it for preliminary shaping and filing and for reducing the length of artificial nails.
After that, move on to filing with a 100-150 grit file.
150 grit, for example, is a great level of coarseness to smooth out the surface of the acrylic, gel, and polygel nails.
Move the file from the cuticles towards the free edge when you’re buffing the surface of your artificial nails. Avoid touching the skin.
Using a slightly higher grit, like 180, on artificial nails will take too long to file them and may cause an unpleasant heating and burning sensation. That’s because you need to do more filing motions with this kind of file.
And, of course, never use a coarse file for shaping your natural nails.
150-180 grit – For filing and buffing the surface of gel polish base coat overlays
Makartt Zebra Nail Files 100/180 Grit
Gel nail polish is softer than artificial nail materials because it’s a coating, not a builder product.
To make it clear, gel polish doesn’t require filing or buffing. However, harder gel polish materials like rubber base gel or hard base coats may need some buffing when you use them as an overlay or as a builder gel.
That’s why you should use 150-180 grit for buffing base gels’ surface to smoothness.
180-240 grit – For filing and shaping natural nails
MAKARTT Nail Files, 180/240 Grit
180-200 is a medium grit. It’s the best coarseness for filing the length of the natural nails and for shaping them.
You can select any of these shapes for your nails.
240-320 grit – For buffing natural nails before applying gel nail polish and artificial nails
Makartt Zebra Nail Files, 240 Grit
240 is the best grit for preparing your natural nails for gel nail polish or nail overlay and extensions application.
Use a 240 grit nail file to buff the shine off the nail plate. This will roughen it slightly and that will help gel polish, acrylics, polygels, and gels adhere better.
This kind of buffing is not intended to polish your nails to smoothness. If you polish the nails instead of roughening them before applying any coating or extensions no materials will ever stick to them.
So don’t over buff the natural nails.
Over buffing is bad for your natural nail plate and that can cause lifting too.
That’s why when you are buffing the shine off your nails always only buff them once. Never buff the same spot twice.
Just like you need to do with artificial nails, try moving the nail file from the cuticle area towards the tip of the nail when you’re buffing the surface of your natural nails to avoid filing the cuticles and the surrounding skin.
You can also use a 240 grit file for the finishing touches on your artificial nails and for smoothing them to perfection.
Nail files over 240 grit often come in the form of 3D buffing blocks instead of flat emery boards.
400-900 grit – For preparing the nails for a high-shine buff
Makartt Fine Nail Buffer 400/6000 Grit
Buffing blocks and nail files with 400 grit and above are micro-abrasive and are good for buffing and polishing the nails to smoothness.
They should mostly be used when you aren’t planning to coat your natural nails with anything. Because no material will ever stick to a super-smooth nail.
1000 grit – For super-shiny buffing
Onsen Professional Japanese 3-Way Buffing Block
1000 and up are the softest nail file grit numbers on the market. These files and buffing blocks are used for finishing off the smoothing process on fake nails and for giving your natural nails a glossy shine without any polishes or top coats.
I hope that this nail file grit chart and this guide clear any confusion you may have and helps you choose the perfect nail file or buffing block for creating gorgeous nails.
Recommended reading:
Best Professional Gel Nail Polish Brands Used In Salons
Best Gel Base And Top Coat: The Updated List Of The Best Gel Nail Base And Top Coat Sets
Kiara Sky Gel Polish: Full Review And Buying Guide
Best No Wipe Gel Top Coat: An Honest Review Of 12 Best No Wipe Top Coat Gel Brands
Non-Toxic Gel Nail Polish Brands 101: Choose The Safest Gel Nail Polish
Most Popular Shellac Colors – The Ultimate List Of 15 Best Shellac Colors For Fantastic Manicures
Best Nail Dehydrator And Primer: The Ultimate Guide
Mermaid Gel Nails 101: Best Mermaid Gel Polish And Mermaid Nail Powder
Best No Light Gel Polish — Gel Nail Polish Without UV Light
Best Small Salon Reception Desk: Make An Amazing First Impression
Overlay Nails 101: Acrylic And Gel Nail Overlay On Natural Nails – The Ultimate Guide
Why Are My Gel Nails Lifting? 15 Reasons Why Your Gel Polish Is Lifting


