Can you put regular nail polish over polygel nails? Let’s see. Polygel nail extensions are extremely popular right now. There’s no doubt about it. But the downside is that they can be expensive. And when you’re spending a lot on a set of nails you probably want them to last as long as possible.
The problem comes when you want to change the look of your nails but you may not want to take off your extensions and replace them with a new set of nails.
One of the ways to renew your extensions is by simply repainting them. But can you put regular nail polish on top of nail extensions? Plus, you probably want to know if regular nail polish would damage polygel.
Can you put regular nail polish over polygel?
In short — yes you can!
In fact, this allows you to change your nail colors and designs more often, quicker, and easier than if you were using gel nail polish. And this method doesn’t ruin polygel nails.
In addition to that, regular nail polish stays on polygel nails a lot longer and better than on natural nails.
Note: regular nail polish can stay up to 2-3 weeks on polygel nails or until you grow tired of the same color or design.
Plus, it’s easier to remove regular polish from polygel nails than from acrylic nails.
Acrylic nails can be ruined by acetone in your nail polish remover because they can be soaked off with acetone.
However, polygel nails are immune to acetone. You can’t soak them off so nail polish remover won’t affect them.
And you can safely wipe regular nail polish off your extensions to repaint polygel nails with another color.
Benefits of painting polygel extensions
- It’s quick and easy to apply.
- It doesn’t ruin or discolor polygel nails.
- It stays longer on polygel nails than on natural nails.
- It’s very easy to remove without ruining polygel nails.
- It allows you to change your nail design in minutes and as often as you’d like without removing or rebuilding your extensions.
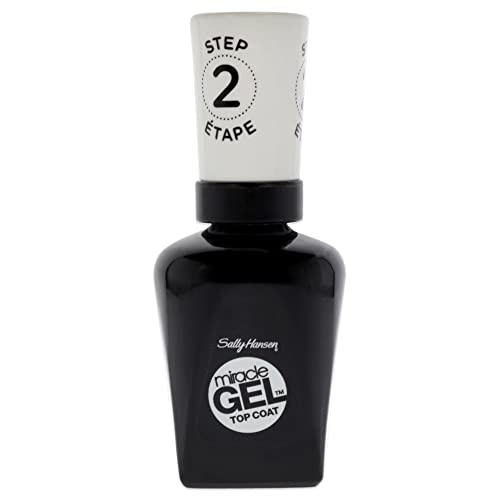
I recommend selecting a good-quality regular polish with a nice staying power and a beautiful finish, for example, Sally Hansen Miracle Gel, which is a regular gel-like nail polish with extended longevity.

How to put regular nail polish over polygel nails
Paint your nail extensions with regular lacquer
Only paint polygel nails after you’ve cured them and filed them to perfect shape.
- Start with a clean, well-cured, smooth surface. No need to use a base coat because the polish adheres to your polygel nails well on its own.
- Cover your nails with two coats (or more) of regular nail polish.
- A common mistake is to slather on a thick polish layer, which ends up making your polygel nails look bulky and unnatural. So avoid applying too many coats of polish or making them too thick.
- Allow each layer of polish to air dry before you apply the next one. You don’t need to use a UV lamp with a regular lacquer.
- Apply a regular top coat to make your nail polish last longer.
If I put regular nail polish over polygel nails, should I use a gel top coat or a regular top coat?
You should only use regular top coats over regular polishes.
A gel top coat can break down the polish. These two products have different chemical properties and should not be used together.
Use nail stamping on polygel extensions

Nail stamping is a popular way to get a striking manicure without the mess and difficulty of actual nail painting.
Instead of painting your nails with a brush, you can stamp a design on them with nail polish.
The process is much faster than painting your nails, and it’s an easy way to change regular nail polish designs on polygel nails.
Nail stamping is a technique where you place an image of your choice on your nail and create a design using a special stamper.
There are thousands of different designs and you can customize your nails with any idea you come up with.
You will need special stamping regular nail polishes and a nail stamping kit, which usually includes a stamper, stamping plates, a scraper, and a set of stamping nail polishes.
Stamping plates, which come in various shapes and sizes, feature various designs, including flowers, trees, animals, and many other symbols.
How to use nail stamping over polygel extensions?
- To make your polygel nail designs look like they were done by professional nail technicians, you should first apply a coat of regular nail polish over your polygel nails and let it fully dry.
- Then apply a special stamping nail polish to a stamping plate. This kind of nail polish is a variety of regular nail polish but is thicker so it is easier to work with.
- After that, use a scraper to remove excess polish from the plate.
- Press the stamper onto the design on the stamping plate and transfer the design onto your nail.
- Press it over the polygel nail and roll it slowly to stamp the design onto your nail extension.
- Remove excess polish from the skin around your nail.
- Let the design dry and seal it with a regular nail polish top coat.
How to make regular nail polish stay on your polygel nails longer
Nail polish adheres to your polygel nails very well on its own and forms a strong bond with this nail extension material.
No need to use a base coat to increase the longevity of the polish.
However, I’d recommend using a regular top coat over the polish to protect it.
Plus, apply the regular polish in thin layers because a thick coat of polish may peel off easier.
How to remove regular nail polish from polygel nails
The good news is that you can easily remove regular lacquer from polygel extensions using a nail polish remover.
The remover won’t cause any harm to your extensions because polygel can’t be soaked off with acetone.
So after you remove the polish the surface of your artificial nails will stay smooth and ready for a new coat of lacquer.
Follow these steps to remove nail polish from your nail extensions:
- Soak a cotton ball in nail polish remover.
- Apply nail polish remover to your nail and press the cotton ball against the surface of the nail.
- After about 10 seconds, scrub your nails with the nail polish remover.
- Wipe off the remover.
- Repeat this on all nails.
In conclusion, yes, you can put regular nail polish over polygel nails and change the look of your extensions as often as you’d like.
The extensions won’t melt, get discolored, or peel, and nail polish will adhere to them extremely well.
Recommended reading:
Best Shellac Colors For French Manicure
Best Professional Gel Nail Polish Brands Used In Salons
Non-Toxic Gel Nail Polish Brands 101: Choose The Safest Gel Nail Polish
Best No Light Gel Polish — Gel Nail Polish Without UV Light
Best Gel Base And Top Coat: The Updated List Of The Best Gel Nail Base And Top Coat Sets
Best Small Salon Reception Desk For A Tight Space: Make An Amazing First Impression!